
Self check-in in Legend EHR #
Legend EHR offers a self check-in feature that allows patients to complete their visit check-in digitally without front-desk assistance. This improves workflow efficiency and reduces waiting time.
Eligibility for self check-in #
Legend EHR imposes some conditions for patients who can self check-in:
- Scheduled appointment on current date
The system allows self check-in only when the patient has an active appointment scheduled for the current date.
- Established Patients
Self Check-In is available only for patients who have previously visited the practice.
- Financial Threshold
Patients whose copay + outstanding balance is less than $100 are eligible.
- Appointment Time Window
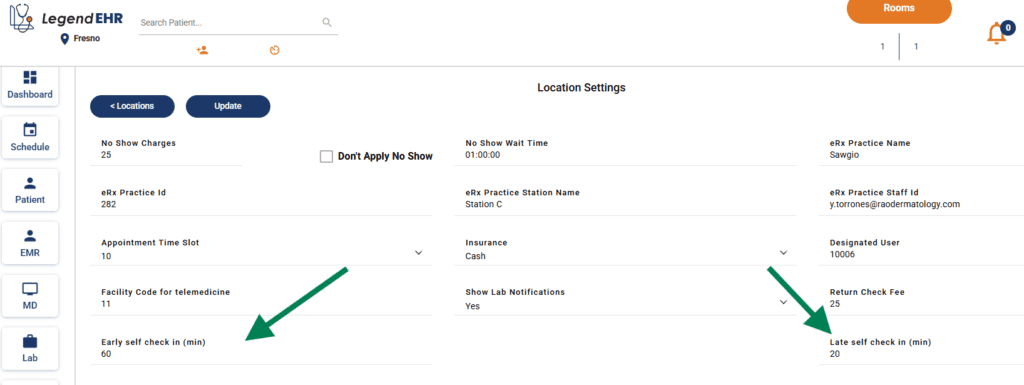
Patients can only use Self Check-In within the time window defined by the practice for their scheduled appointment. Legend allows practices to set two limits: an early check-in threshold and a late check-in threshold.
Patients who arrive before the allowed early check-in time cannot self check in until they fall within the permitted window. Similarly, patients who arrive after the late check-in time cannot self check-in.
Configuring appointment time window #
You can configure early and late check-in time for your office through Settings > Practices > Manage Location > Location settings
- Go to Settings
- Go to Practices
- Go to Manage Locations
- Click on Settings icon for the relevant location
- Add early check-in time
- Add late check-in time
Self check-in steps for patients: #
- Identify whether you’re a new patient or an established patient
- Enter you last name and DoB
- Review your demographic information
- Sign consents, if any
- Review your insurance information
- Check-in


